Introduction
Have you recently bought a new Webflow template from the Marketplace? After spending time searching, you finally found the one you liked and completed your purchase. Now it's time to customize it and make it match your brand and business.
Buying a portfolio, agency, or business Webflow template is only the first step. To customize it properly, you need to understand a few basic Webflow features. With some simple knowledge, you can quickly replace the default content, update the design, and launch a professional website.
At first, Webflow template customization may seem difficult and time-consuming, but it doesn't have to be. Once you understand how the template is built, making changes becomes much easier. In this guide, you'll learn how to customize a Webflow template step by step while keeping it clean, scalable, and easy to maintain.
Before You Start Customizing Your Webflow Template
After purchasing a Webflow template, the first thing you should do is open the Style Guide page. Every high-quality Webflow template should include one. You can even preview it before buying by opening the template in the Webflow Designer.
Don't stop at the homepage. Take a few minutes to explore every page in the template. Sometimes the homepage looks polished, while the inner pages receive much less attention. Reviewing the entire website before making changes will help you understand the template better and avoid unexpected issues later.
Understand How the Template Is Built
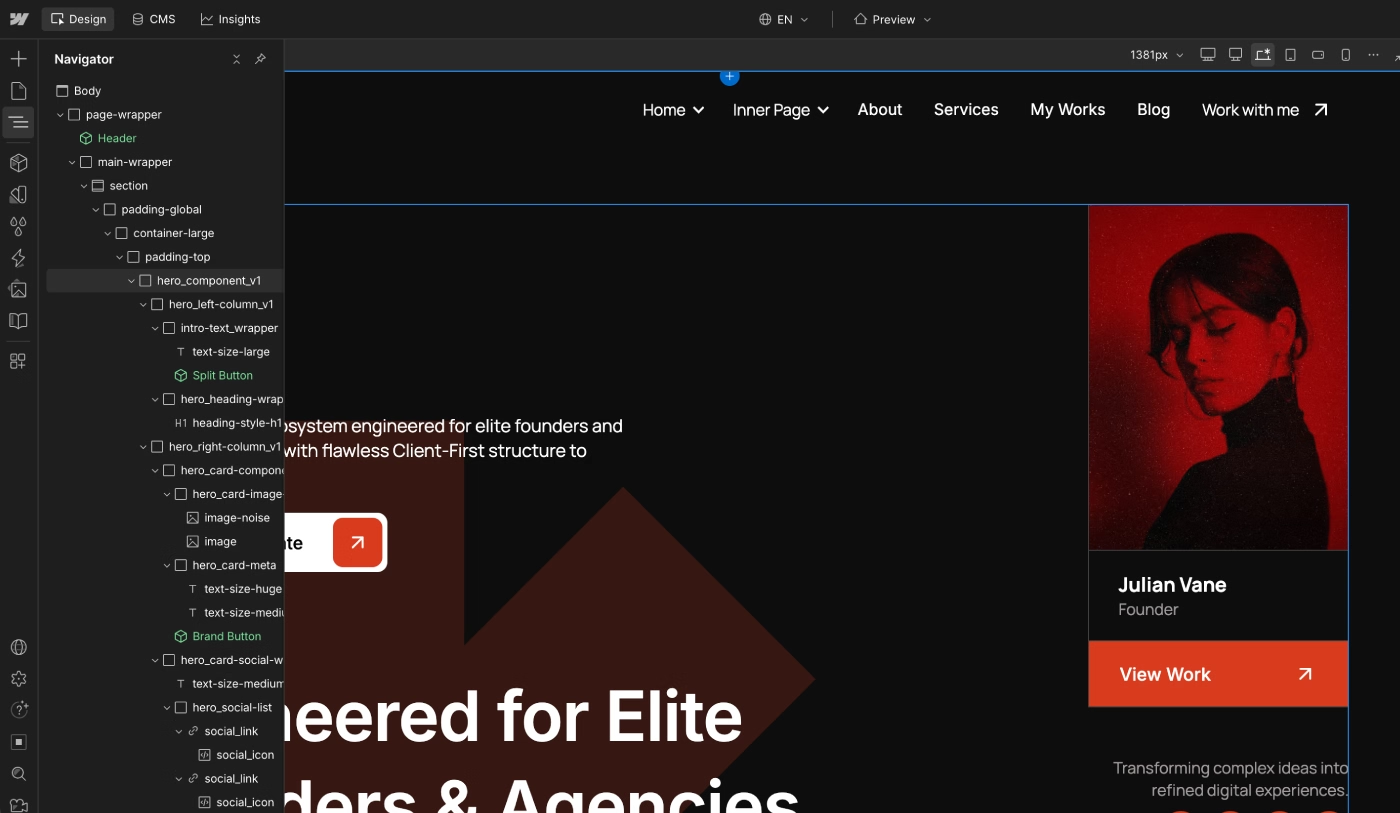
Before you start editing anything, spend some time learning how the template is built. Check the page structure, class naming, Components, CMS Collections, and Variables. This will help you understand what can be changed easily and what requires a little more attention.
Open the Components panel and see which components are used across the website. Check how many times they are reused and whether they include editable Properties. A well-built template should let you update text, images, and other content without opening the component every time.
Next, review every CMS Collection. Look at the existing fields and think about what content you want to add. If some fields are missing, you can always create new ones before you start adding content.
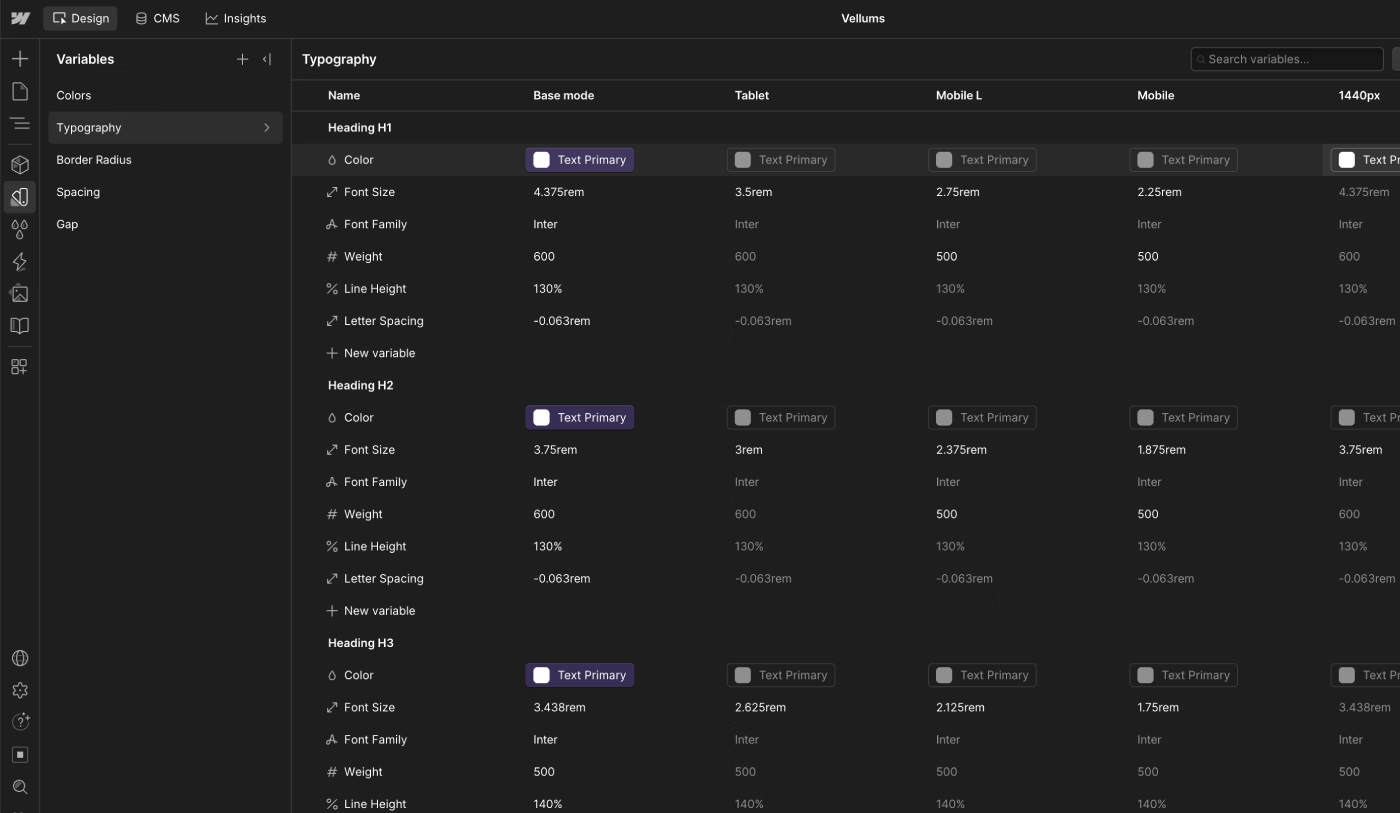
Open the Variables panel and check whether all colors, typography, spacing, and gap values are managed there. Ideally, each breakpoint should have its own Variables. This makes it much easier to update the design across the entire website from one place instead of editing every element manually.
You should also review all global typography styles, including Heading H1–H6, paragraphs, quotes, and utility classes. Make sure they are consistent and correctly configured. This small check can save a lot of time later.
One of the common mistakes is using heading tags only to create beautiful text animations while sacrificing a proper heading hierarchy. I describe this issue in detail and show a real example later in this case study.
Finally, review the template's Interactions. Make sure animations are easy to edit and work with your future content. Some templates are designed only for the demo content, making it difficult to customize animations without rebuilding them.
Spend 15–20 minutes exploring the template before making any changes. Understanding the structure first will save hours of work later.
Prepare Your Brand Assets
Before you begin customizing your Webflow template, prepare everything your brand needs. Having all your assets ready will make the process much faster and more organized.
- Start with your logo. If possible, use an SVG version instead of PNG or JPEG. SVG files stay sharp on every screen and are usually much smaller, helping your pages load faster.
- Prepare your brand colors. Most modern Webflow templates already use Variables, so you can simply replace the existing colors or add new ones if your brand requires additional color styles.
- Choose your fonts before you start editing the template. Marketplace templates usually include free fonts, but after purchasing the template, you're free to replace them with any fonts that match your brand.
- Optimize all images before uploading them. Compress them to reduce file size while maintaining good quality. As a general recommendation, try to keep most images below 150 KB whenever possible.
- Your website copy should also be ready. You can update content page by page, but having your headings, paragraphs, and calls to action prepared in advance will speed up the customization process.
- Don't forget your SEO information. Prepare a unique Meta Title and Meta Description for every page. You should also create an Open Graph image with a recommended size of 1200 × 630 pixels so your pages look professional when shared on social media.
- Finally, prepare all your social media links, such as LinkedIn, Instagram, X, Facebook, or any other platforms your business uses. If the template doesn't include a specific social network, you can easily add it later.
Preparing your assets before you start editing allows you to focus on customization instead of constantly switching between design files, documents, and Webflow.
Create a Backup Before Making Changes
Before you start customizing your Webflow template, create a backup of your project. A backup gives you a safe starting point in case you accidentally change or delete something important. It also allows you to restore animations, Components, or page settings if something goes wrong during customization. Many users skip this step and later have to contact the template author for help. Creating a backup only takes a few seconds but can save you many hours of work.
To duplicate your project, open your Workspace, click the three dots next to your project, and select Duplicate.
Always create a backup before making major design or CMS changes. If you plan to experiment with layouts or animations, consider creating additional backup versions as you work.
Learn the Template Structure First
Now that you've reviewed the basic setup, it's time to take a closer look at the template itself. Understanding how everything is organized before making changes will help you customize the website faster and avoid unnecessary mistakes. Many users skip this step because they want to start editing immediately. However, spending just a few minutes exploring the template will save much more time later.
If you are considering a free Webflow template, I also wrote a guide explaining the potential limitations you should check before choosing one.
Review the Style Guide
The Style Guide is one of the most important pages in a Webflow template. It shows how the entire design system is built and helps you update the website consistently.
- Colors. All colors should be managed with Variables. Although you can change colors manually in the Style panel, updating Variables is much faster and keeps your design consistent across the entire website.
- Typography. Check whether the template fonts match your brand. If you plan to create a multilingual website using Webflow Localization, make sure the selected fonts support all the languages you need. Some fonts don't include characters for languages such as German, French, or Ukrainian, so you may need to replace them.
- Spacing. Spacing values should also be managed with Variables whenever possible. Review the spacing scale and decide whether you need to increase, decrease, or add new values. Don't forget to check how spacing adapts across different breakpoints.
- Buttons. Buttons should be built as reusable Components. Check their hover effects, animations, and different states to make sure everything works correctly after customization.
- Forms. Review every form in the template. Update the email address that will receive new submissions, make sure there are no duplicate field IDs, and test both the success and error messages. If necessary, customize these messages to match your brand voice.
A well-organized Style Guide allows you to update your entire website from one place instead of editing dozens of individual elements. This makes future maintenance much easier.
Explore Components
Components are one of the biggest advantages of Webflow. Spend some time exploring how they are built and where they are used throughout the website. Open the Components panel and review the list of reusable elements. Their names usually make it easy to understand their purpose and where they appear.
Avoid breaking Components unless it's absolutely necessary. Instead, edit the Component itself or add new Properties that allow you to customize text, images, links, and other content without changing the Component structure.
To add a new Property:
- Open the Component.
- Select the text, image, or element you want to make editable.
- Open the Settings panel.
- Click Review next to Suggested Property.
- Enter a name for the new Property and click Create.
That's it. Your Component now has a reusable Property that can be edited without opening the Component every time. Using Components correctly helps you keep your website consistent and makes future updates much faster, especially on larger websites with many pages.
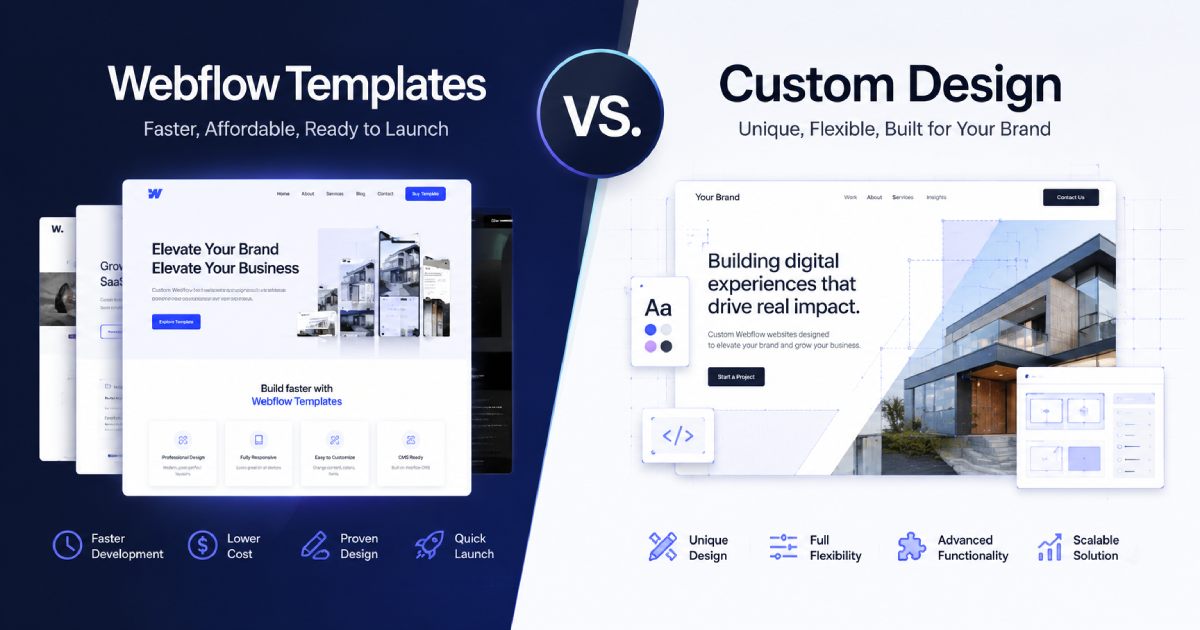
You can also consider a custom Webflow website built specifically for your business needs. I explain the key differences between a custom website and a Webflow template in this case study.
The best Webflow templates use Components not only for design consistency but also to make customization easier for users after purchase.
Check CMS Collections
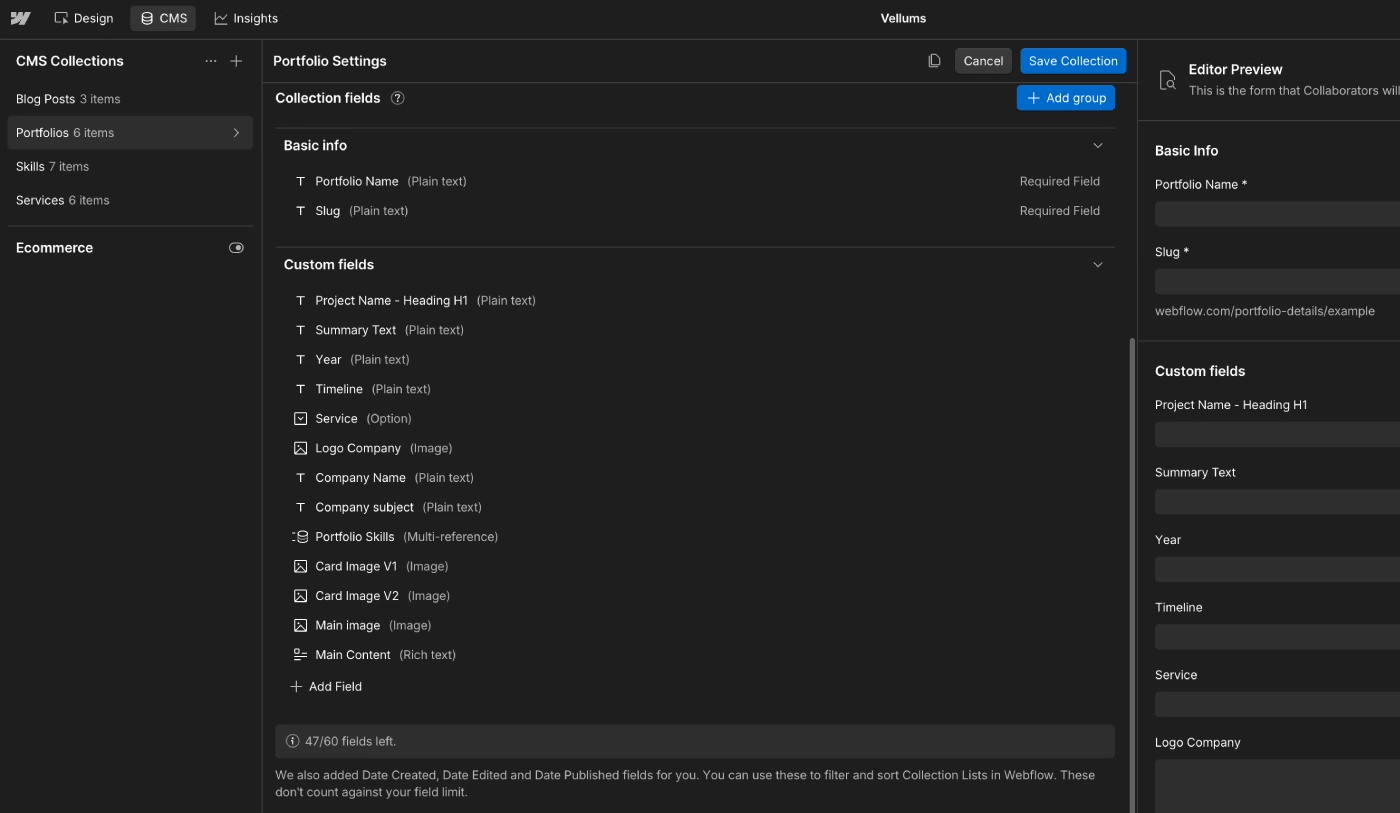
After reviewing the template structure, you can move on to the CMS Collections. Open the CMS panel and explore all the Collections included in the template. Each Collection is responsible for displaying different types of dynamic content. If you need additional fields, open the Collection settings by clicking the Settings icon next to the Collection name. Here you can add, edit, or remove Collection Fields based on your project requirements.
After making changes to the Collection structure, publish your website before adding new content. This ensures that all new fields become available throughout the project. When adding or editing Collection Items, always make sure their status is Published. Otherwise, the content won't appear on your live website.
Some of the most common CMS Collections in Webflow templates include:
- Projects
- Blog Posts
- Team Members
- Categories
- Authors
- FAQ
The FAQ Collection deserves special attention. A well-structured FAQ section helps visitors quickly find answers to common questions and is also easier for AI assistants such as ChatGPT, Gemini, and Claude to understand. Search engines also use FAQ content to better understand your website and its topics.
Before adding new Collection Fields, check whether the information can already be stored in an existing field. Keeping your CMS simple makes it easier to manage in the future.
Customize Your Brand Identity
Now it's time to transform the template into your own brand.
Don't try to change everything at once. Work through each section step by step and make sure every update is complete before moving on. This approach helps you avoid missing important details and keeps the customization process organized.
In this case study, I show how I completely redesigned the website and shifted it to a dark theme.
Replace the Logo
Start by replacing the logo.
Open the Header component on the homepage. In most professional Webflow templates, the Header is built as a reusable Component. Once you replace the logo inside the Component, it will automatically update on every page where the Header is used.
Next, open the Footer Component and replace the logo there as well. Some templates may also use the logo in other sections, so take a few minutes to check the rest of the website.
If possible, upload your logo as an SVG file. SVG images stay sharp on every screen size and usually have a much smaller file size than PNG or JPEG images.
Finally, update your Open Graph Image.
Open the settings for each page and navigate to Open Graph Settings. Here you can update the Open Graph Title, Description, and Image. The recommended image size is 1200 × 630 pixels, which displays correctly on most social media platforms.
Update Global Colors
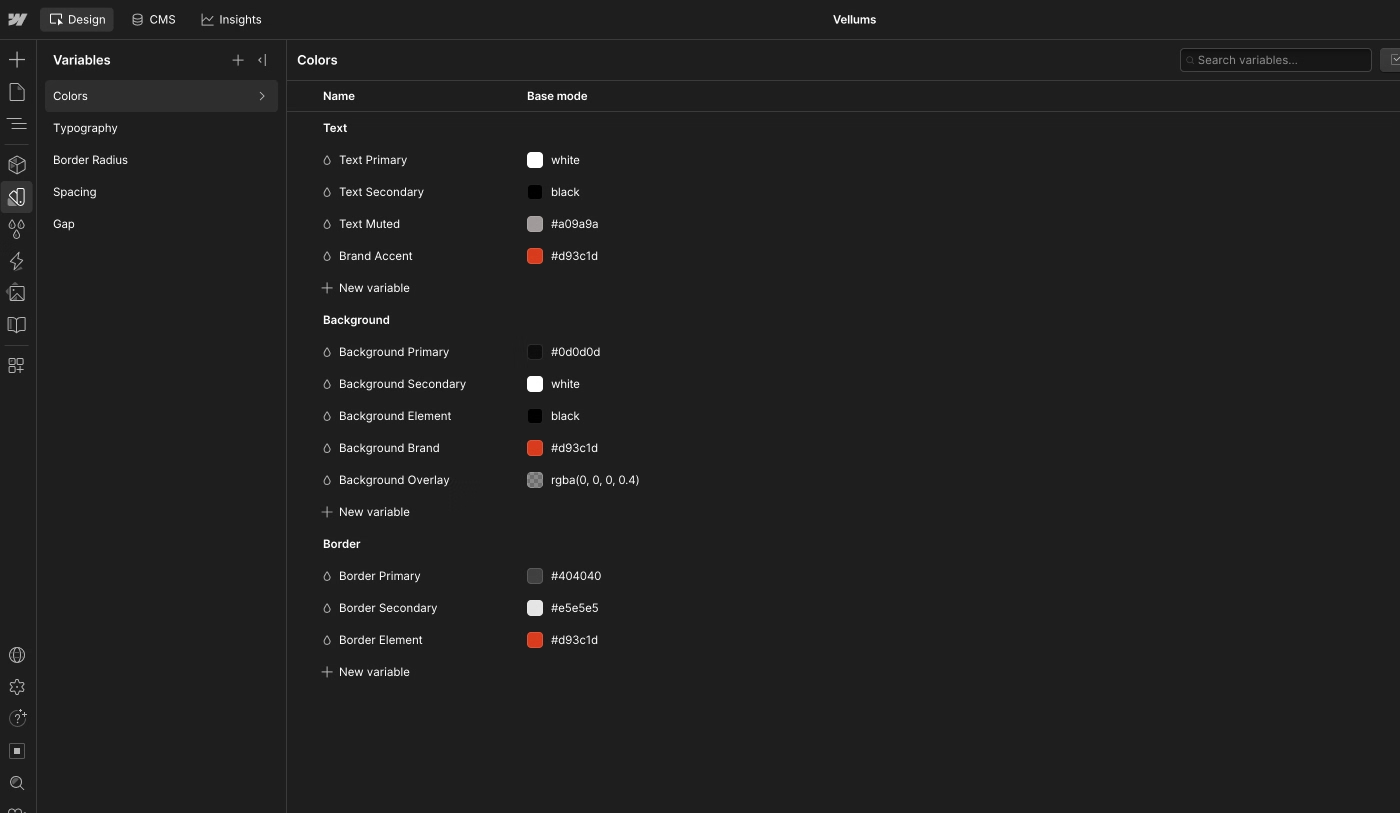
The easiest way to change your website colors is by updating the existing Variables.
Open the Variables panel and review the color collection. Replace the existing colors with your brand colors whenever possible. If your brand uses additional colors, simply create new Variables before applying them throughout the template.
Avoid changing colors manually inside individual classes. Doing so breaks the design system and makes future updates much more difficult.
Global Variables allow you to update your entire color palette in seconds. Instead of editing dozens of elements, you only change the Variable once.
Change Fonts
Changing fonts is much easier than editing every heading or paragraph individually. Start with the global typography styles.
In the Style Selector, find the Body (All Pages) selector and replace the default font with your own. Some templates also include a Body class that controls typography across the website, so review both.
Next, update the global heading styles, from All H1 Headings to All H6 Headings. Most professional templates also display these styles on the Style Guide page, making them easy to find and edit.
While you're on the Style Guide page, review the fonts used for Buttons, Forms, and other reusable UI elements. Consistent typography across the entire website creates a much more professional result.
Before choosing a font, make sure it supports every language your website will use. This is especially important if you plan to add additional languages with Webflow Localization later.
Replace Template Content
Once you've updated your brand colors, fonts, and overall visual style, it's time to replace the template content with your own.
Take your time during this step. Some headings, text blocks, or images may have custom widths, animations, or layout settings. After replacing the content, review each section to make sure everything still looks clean and works as expected.
Update Headlines and Text
Start with the homepage. Some Webflow templates include multiple homepage versions, so choose the one that best matches your business before you begin editing. Replace all headings and text with your own content while keeping a clear heading hierarchy.
- H1 – Every page should have only one H1 heading.
- H2 – Main section headings.
- H3 – Subheadings that support the H2 section.
- Paragraphs – Replace the placeholder text with your own content.
- CTA – Update all call-to-action buttons and sections to match your business goals.
If your template includes an FAQ section, review both the questions and answers carefully. A good practice is to use each question as an H3 heading instead of regular text. This makes the content easier to read and helps search engines and AI assistants better understand the page structure.
Don't simply replace the demo text. Rewrite it to reflect your business, services, and target audience. Original content always performs better than copied text.
Replace Images and Videos
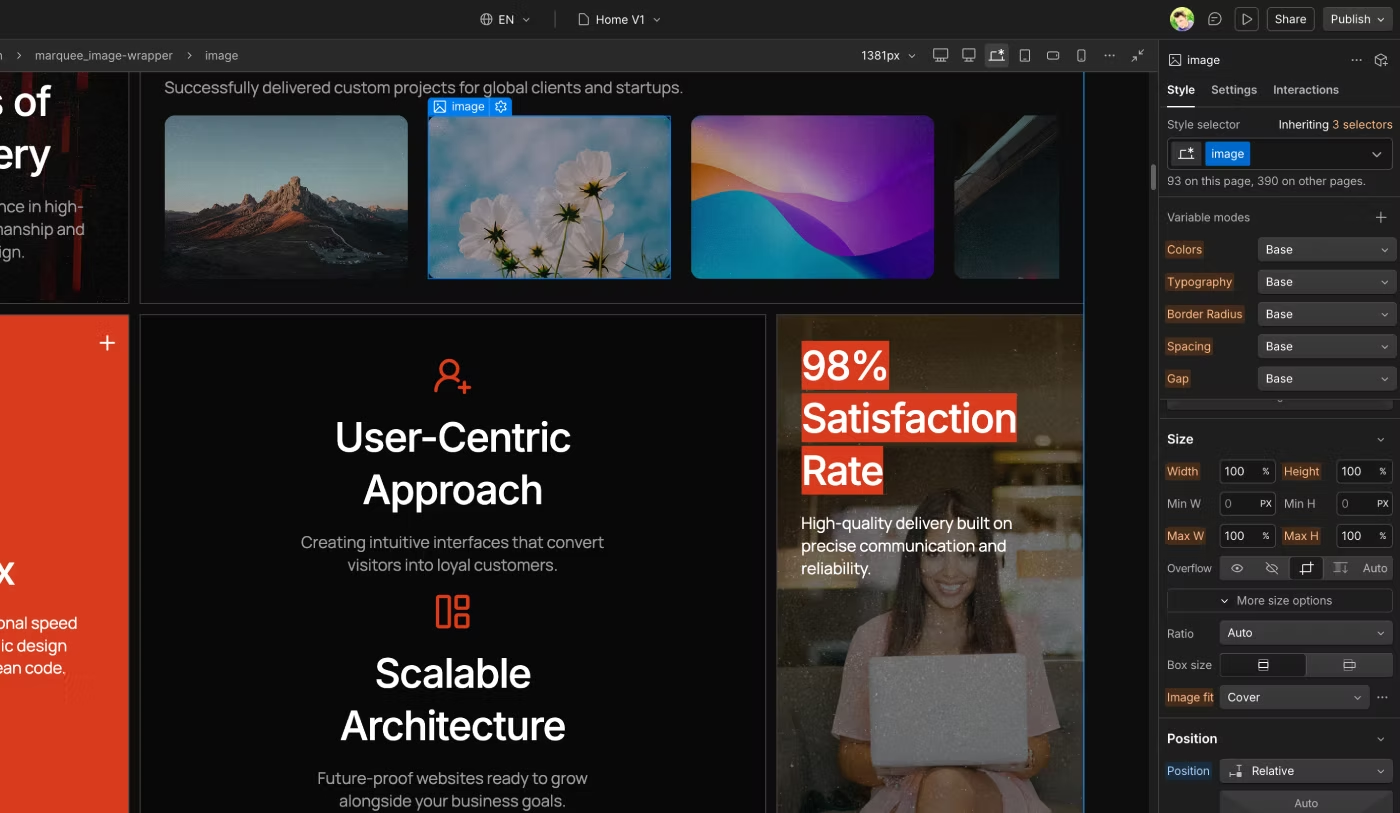
Try to use the same aspect ratios as the original template. Most templates are designed around specific image proportions, and using different sizes may affect the layout.
Check the image settings in the Style panel. Pay attention to the image size, aspect ratio, and Object Fit settings. Many templates also use image wrappers with additional styling, so it's worth reviewing these before replacing images.
Every image should include descriptive Alt Text. Alt text improves accessibility and helps search engines understand what the image represents. Decorative icons or purely visual graphics can use decorative alt text when appropriate.
Whenever possible, save images as WebP or AVIF files. These modern formats usually provide much better compression while maintaining excellent image quality.
Webflow also includes a built-in image compression tool. Open the Assets panel, expand the Asset Manager, select your images, and click Compress Selected Assets to reduce file sizes.
Optimized images improve page speed, user experience, and SEO while keeping your website visually attractive.
Update Links and Contact Information
Many Webflow templates include links to demo pages, the template author, or the Webflow Marketplace. Review every page and replace or remove links that are no longer needed.
- Navigation Menu. Check every navigation link and make sure it points to the correct page. Remove unnecessary menu items and update button links if required.
- Footer. Review all footer links, including navigation, legal pages, and external links. Most template authors include links to their own website or the Marketplace, and you can safely replace these with your own content.
- Email. Replace the default email address with your own and test the link after publishing. Clicking the email address should open the visitor's default email application.
- Phone Number. Update both the visible phone number and the tel: link. This allows mobile users to call your business directly with a single tap.
- Social Media. Replace all demo social media links with your own profiles. If your business uses additional platforms, simply add new icons and links where needed.
Before launching your website, click every button and every link at least once. Broken links are one of the easiest mistakes to overlook during template customization.
Customize CMS Content
Once you've finished customizing the design and static pages, it's time to update your CMS Collections and all dynamic content.
Most templates include a basic CMS structure, but you'll probably need to add new Collection Fields to match your own content. Before making changes, open the CMS panel and review all Collections included in the template.
Edit Collection Items
Start with one Collection and complete it before moving on to the next. Editing multiple Collections at the same time can quickly become confusing and make it harder to find mistakes later.
If you're customizing a Projects Collection, replace the demo projects with your own work. Fill in every available field and add new Collection Fields if your content requires additional information.
When editing Blog Posts, replace the demo articles with your own content. A professional blog template should include fields such as Author, Publish Date, and Reading Time. These fields improve the user experience and make your articles look more professional.
Some templates also include a Team Members Collection. Replace the demo profiles with your own team information and upload high-quality profile photos.
While editing Collection Items, don't forget to review the SEO fields. If your Collection includes Meta Title and Meta Description, make sure every item has unique metadata.
Complete one Collection before starting another. This keeps your content organized and makes it much easier to spot missing fields or unpublished items.
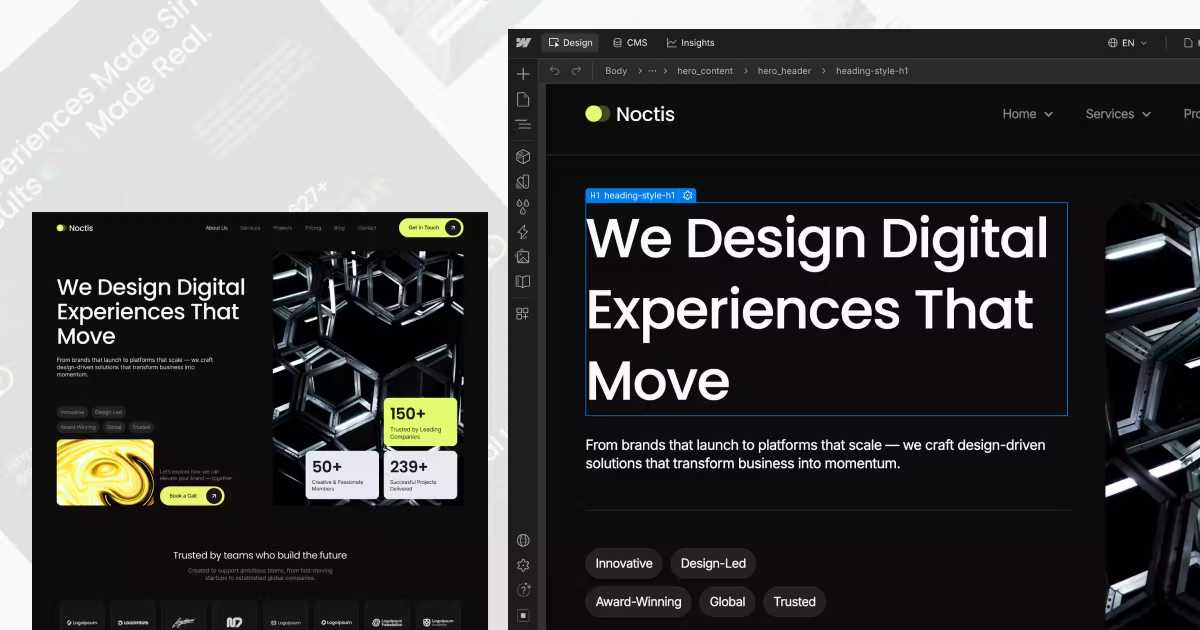
Based on an in-depth analysis of 90 Webflow templates, we have designed an optimized Services and Portfolio layout specifically for Noctis. Explore the full breakdown in this case study.
Update Dynamic Pages
After your Collection Items are ready, you can customize the CMS Template Pages.
These pages automatically display content from your Collections. If you want to add a new section, heading, image, or paragraph, first create the necessary Collection Field. Then connect the element on the Template Page to that field.
To connect an element to CMS data:
- Select the element.
- Open the Settings panel.
- Click the purple Connect to Data icon.
- Choose the appropriate Collection Field.
This allows every Collection Item to display unique content automatically. Review the following settings before publishing:
Template Pages
CMS Template Pages control how every Collection Item is displayed. Any design changes you make here will automatically apply to all items in that Collection.
Slug
Check that every Collection Item has a clean and descriptive URL slug. Short, readable URLs are better for both users and search engines.
SEO
Review the page's Meta Title and Meta Description settings. If necessary, create dedicated CMS fields for SEO metadata and connect them to the page settings. As a general recommendation:
- Meta Title: 50–60 characters
- Meta Description: 150–160 characters
Open Graph
Connect an image from your Collection to the Open Graph Image field. This allows every CMS page to display a unique preview image when shared on social media.
A well-structured CMS lets you manage hundreds of pages from one place while keeping your content organized, scalable, and easy to update.
Improve SEO Before Publishing
At this point, your website is almost ready to launch. Before publishing, take some time to review your SEO settings. Small improvements at this stage can make a big difference in search engine visibility. Besides adding metadata, pay attention to page structure, indexing settings, image optimization, and technical SEO.
Update SEO Settings
Every page should have its own unique SEO settings.
Meta Title
Write a unique title that clearly describes the page. Avoid copying titles from competitors. A good title should accurately reflect the page content while naturally including your primary keyword.
Meta Description
Create a short, unique description that encourages users to click on your page in search results. Keep it clear, informative, and within the recommended character limit.
Canonical URL
Open your Project Settings and configure the Global Canonical Tag URL. This helps search engines understand the preferred version of your website.
Indexing
Review every page and make sure important pages are not blocked from indexing.
In your Project Settings, you should also:
- Disable indexing for the Webflow staging domain.
- Configure your robots.txt file.
- Enable Traffic Controls.
- Generate an XML sitemap.
- Add an llms.txt file to help AI systems better understand your website.
- Connect your website to Google Search Console.
These are the basic SEO settings that every Webflow website should include before going live.
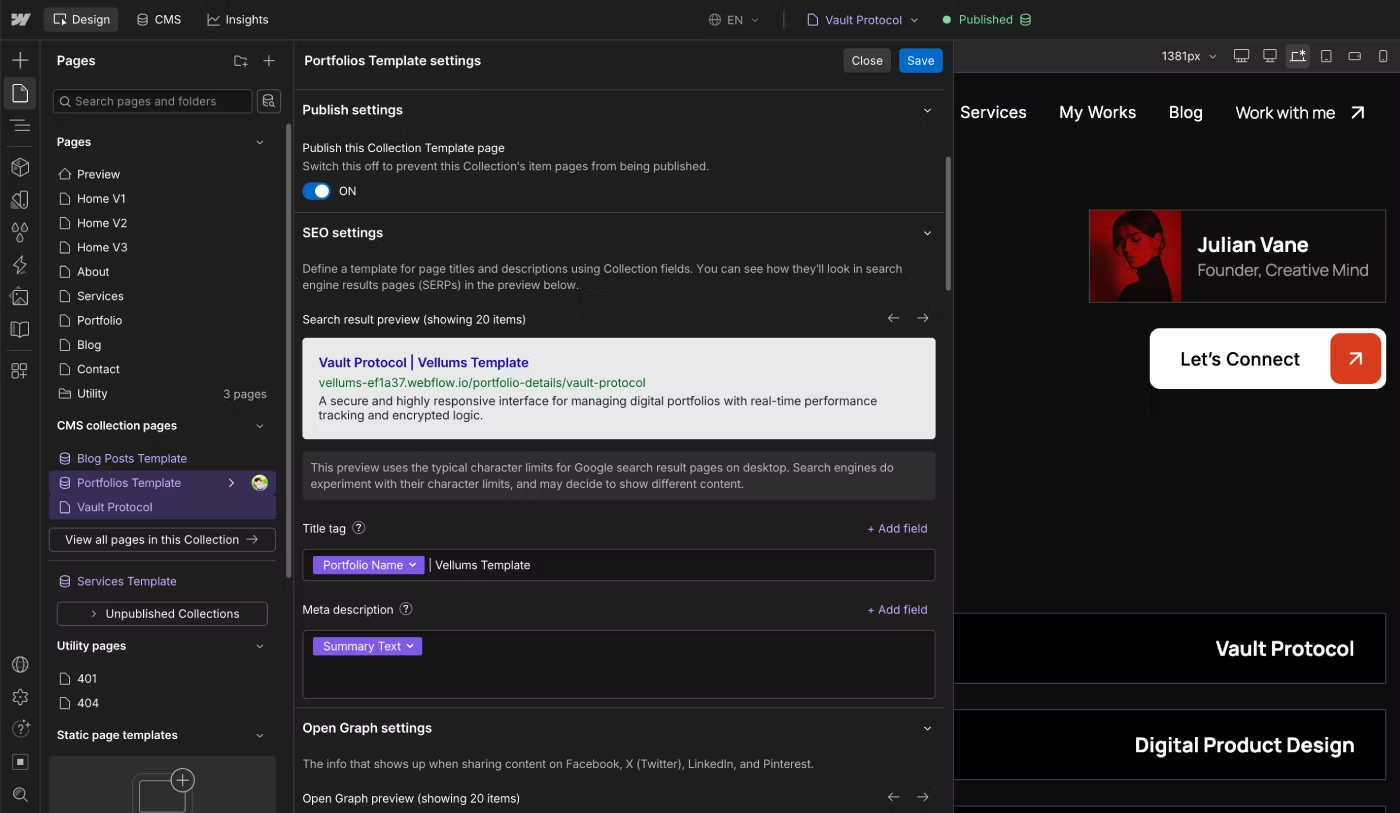
SEO isn't something you finish after launching your website. It's an ongoing process, but setting up the basics correctly from the beginning gives your website a much stronger foundation.
Optimize Images
Images have a major impact on both website performance and SEO. Before publishing your website, make sure every image is properly optimized.
Alt Text
Every image should include descriptive Alt Text. Keep your descriptions clear and natural without stuffing them with keywords. Good alt text improves accessibility and helps search engines understand your content.
Lazy Loading
Enable Lazy Loading for images whenever appropriate. This allows images below the fold to load only when visitors scroll to them, improving page speed.
Compression
Before publishing, optimize all images using Webflow's built-in image compression tool. Smaller image files help your website load faster without noticeably reducing quality.
Optimizing images is one of the easiest ways to improve your website's performance without changing the design.
Check Heading Structure
A clear heading hierarchy makes your content easier to read for both visitors and search engines. Every page should include only one H1 heading. Use H2 headings for the main sections and H3 headings to organize related content within those sections.
Avoid skipping heading levels. For example, don't jump directly from an H2 to an H4 unless there's a good reason. A logical structure helps search engines and AI systems better understand your content. As a simple rule:
- H1 — One main heading per page.
- H2 — Main content sections.
- H3 — Subsections that support the H2 topic.
A well-organized heading structure improves readability, accessibility, SEO, and AI understanding of your content.
Test Every Page
Once you've finished customizing your website, publish it and review every page carefully. Many issues only become visible after publishing. Spending time testing your website now is much easier than fixing problems after visitors find them.
Check Responsive Design
Review your website on every screen size supported by Webflow.
- Desktop. Check every page on a desktop or laptop. Make sure layouts, spacing, typography, and images display correctly on larger screens.
- Tablet. Test your website on a tablet. Pay special attention to navigation, responsive layouts, and any sections that change significantly between breakpoints.
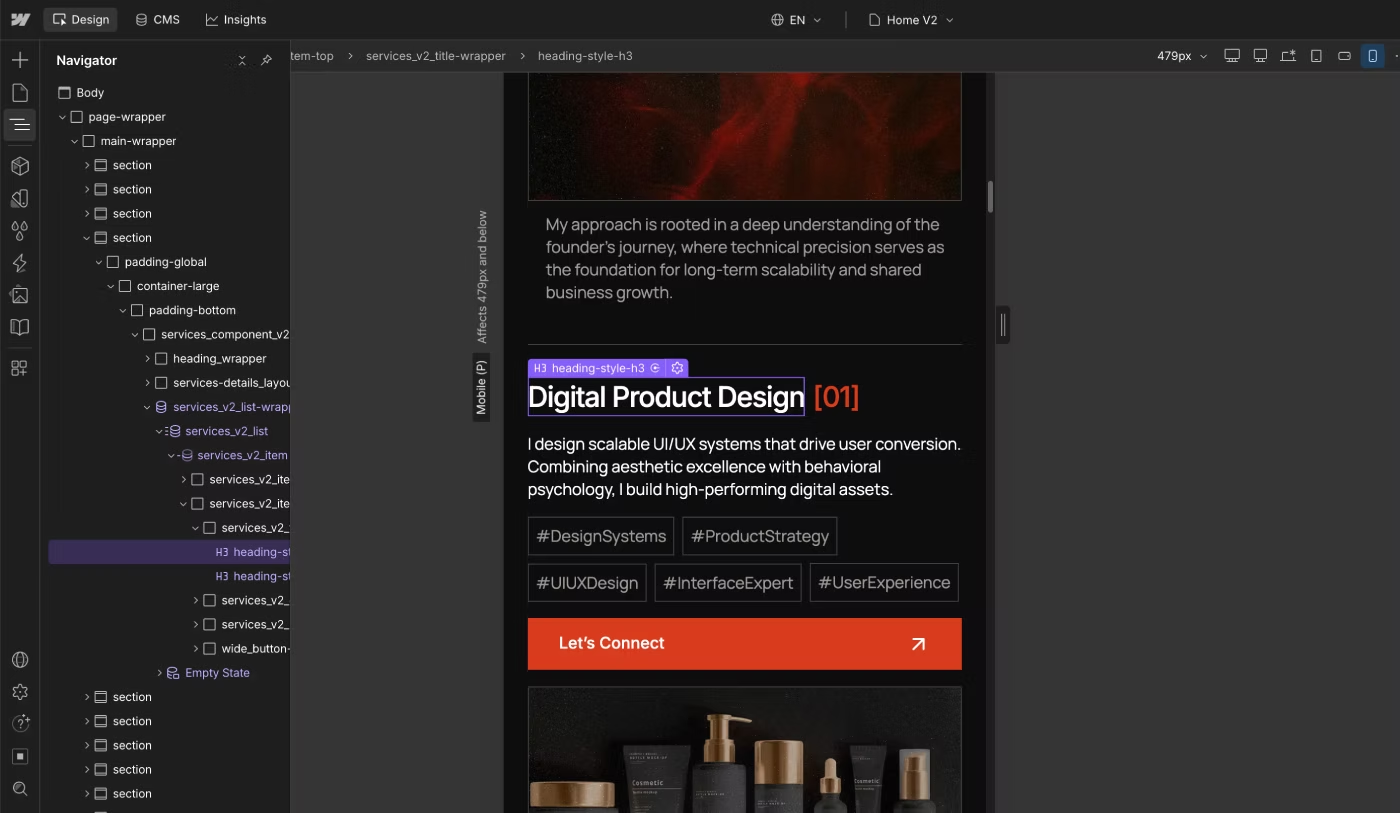
- Mobile. Carefully review every page on a mobile device. Test buttons, forms, sliders, tabs, and animations to make sure everything works as expected.
- Landscape Mode. Don't forget to rotate your phone into landscape mode. Some users browse websites this way, and certain layouts may require small adjustments.
Test your website on real devices whenever possible. Browser previews are useful, but nothing replaces checking the live website on an actual phone or tablet.
Test Forms and Interactions
Interactive elements should work just as well as the design itself.
Forms
Submit every contact form and verify that messages are delivered to the correct email address. Review both the success and error messages, and make sure the layout still looks good on mobile devices.
Buttons
Click every button on the website. Confirm that each one links to the correct destination and opens in the appropriate tab when necessary.
Navigation
Test the navigation menu on desktop, tablet, and mobile devices. If your header is sticky, make sure it doesn't cover important content while scrolling.
Sliders
Review every slider to ensure navigation works correctly on all screen sizes. If autoplay is enabled, verify that the timing feels natural.
Filters
If your website includes CMS filters or category filters, test them thoroughly on every device to make sure they work as expected.
Visitors notice broken interactions immediately. Even small issues with forms or navigation can reduce trust and lead to lost conversions.
Review Performance
The final step is checking your website's performance.
Keep in mind that not every performance issue can be solved. Some optimizations are limited by the Webflow platform itself. However, there are still several important improvements you can make before launch.
Google PageSpeed Insights
Run your website through Google PageSpeed Insights. Review the recommendations and optimize images, remove unnecessary scripts, and fix any issues that can improve loading speed.
Core Web Vitals
Check your website using tools such as GTmetrix or WebPageTest. Pay close attention to metrics like Largest Contentful Paint (LCP), Cumulative Layout Shift (CLS), and Interaction to Next Paint (INP). These metrics help identify performance issues that may affect user experience.
Google Search Console
After publishing, connect your website to Google Search Console and monitor indexing, Core Web Vitals, and crawl errors over time.
Browser Console
Finally, open your browser's Developer Tools and review the Console for JavaScript errors, missing resources, or other technical issues that may not be visible on the page.
Don't chase a perfect PageSpeed score. Focus on creating a fast, stable, and user-friendly website instead. A score of 100 isn't necessary if your real-world performance is already excellent.
Common Mistakes When Customizing Webflow Templates
Even a well-built Webflow template can become difficult to maintain if it's customized incorrectly. Below are some of the most common mistakes to avoid.
Editing Individual Classes Instead of Global Styles
One of the biggest mistakes is editing individual classes instead of updating global styles. If your template already uses Variables, global typography, and reusable classes, avoid overriding styles on individual elements. Doing so breaks the design system and makes future updates much more difficult.
Whenever possible, update colors, spacing, typography, and other design tokens from one central location instead of editing each element manually.
A scalable Webflow template relies on consistency. Global changes save time and help keep your design system organized.
Breaking Components
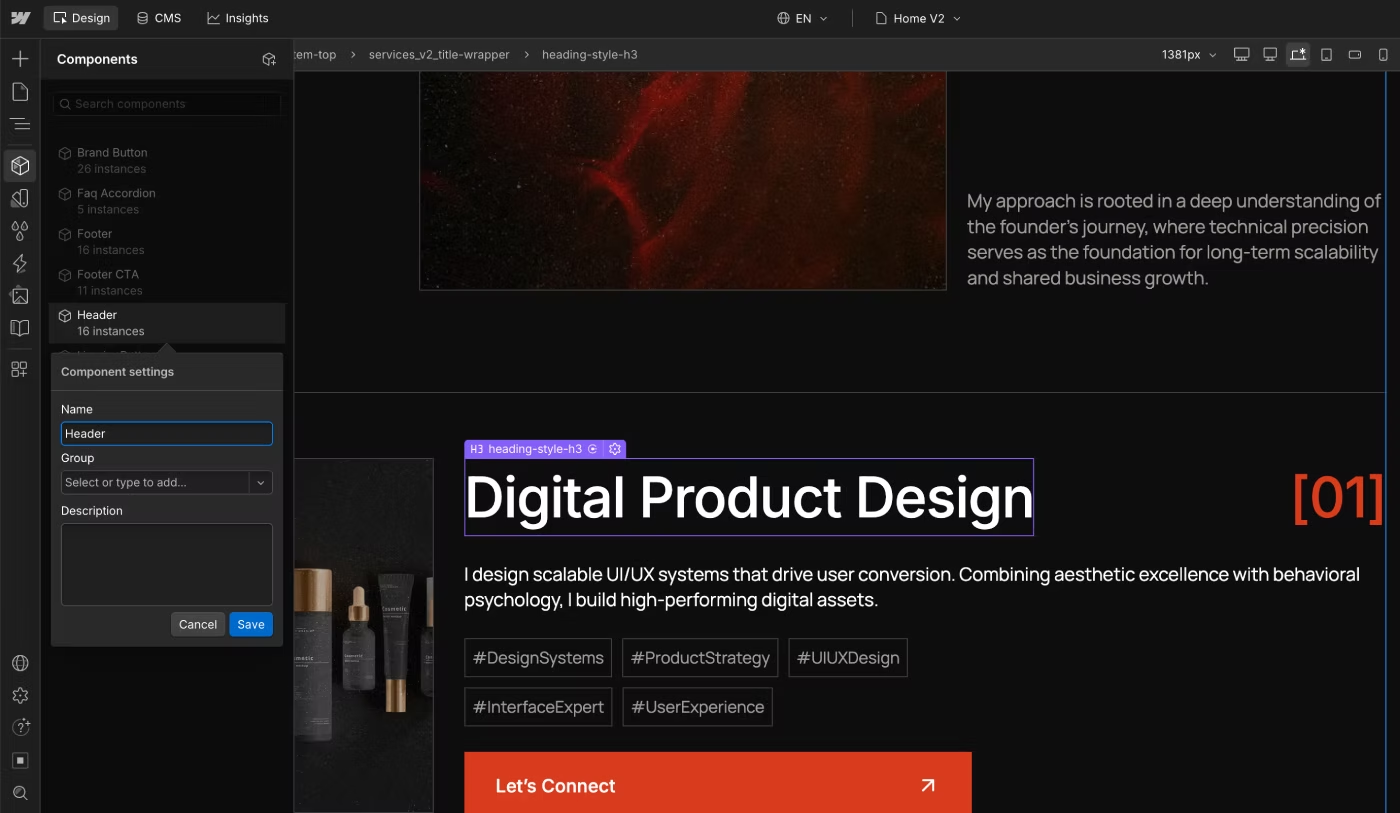
Avoid detaching or rebuilding Components unless it's absolutely necessary.
Components are designed to keep your website consistent and easy to maintain. Instead of breaking them apart, edit the existing Component or add new Properties that allow you to customize content without changing its structure.
Keeping Components intact makes future updates faster and reduces the risk of unexpected design issues.
Deleting Pages Too Early
Don't delete pages immediately after purchasing a template.
Many templates include technical pages such as a Style Guide, utility pages, or demo layouts. Even if you don't plan to publish these pages, they can be extremely useful while customizing the website.
For example, the Style Guide contains your global typography, color system, spacing, buttons, forms, and reusable UI elements. Removing it too early may make future customization much more difficult.
Most professional Webflow templates already exclude these pages from search engine indexing, so they won't affect your SEO.
Ignoring the CMS Structure
Before changing your CMS structure, make sure you understand how it works.
Adding or removing Collection Fields without a clear plan can break dynamic pages and make content management more difficult.
If you're unsure how to modify your CMS, learn the basics first or ask an experienced Webflow developer for guidance. A well-organized CMS will save you a lot of time as your website grows.
Don't customize only for today's content. Build a CMS structure that will still work six months or a year from now.
Ignoring Webflow Variables
One of the most common mistakes when customizing a Webflow template is ignoring the existing Webflow Variables. Some clients break the connection with the existing variables and start adding colors, fonts, spacing, and other values manually to individual classes.
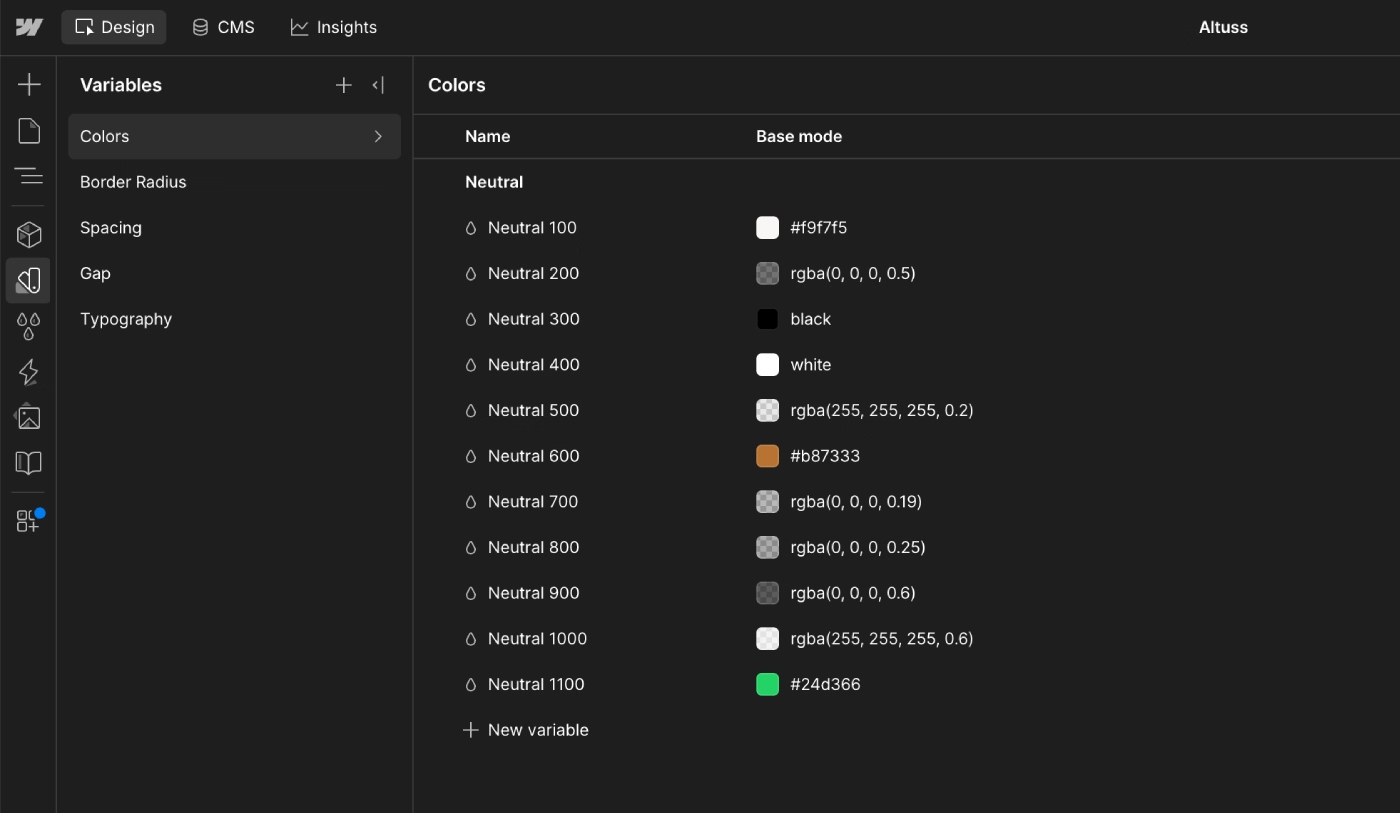
This is not the best approach. Before making changes, you should first review the existing Webflow Variables and design system. If you need new colors, typography settings, or spacing values, add new variables and keep the existing system consistent.
In our experience, ignoring Webflow Variables can lead to many problems later. Fixing these issues takes extra time and can make the website harder to maintain, scale, and adapt to different screen sizes.
Breaking the Responsive Layout
Another common mistake happens when clients change the content or add new sections on the base breakpoint without checking how the layout works on tablet and mobile devices.
Every time you customize a Webflow template, you should check the layout across all important breakpoints. Pay special attention to image sizes, grids, flex layouts, spacing, and typography.
Responsive layouts often require different settings for different screen sizes. For example, you may need to increase or reduce the number of columns in a grid, change the direction of a flex layout, or adjust spacing and image sizes for smaller screens.
Always test your Webflow responsive design after making significant changes to the content, layout, or components.
Replacing Template Content Without Checking the Layout
Replacing the original template content can also cause unexpected layout problems. The original text in a Webflow template is usually created to fit a specific layout and screen size. When you replace it with longer or shorter content, the design may no longer work as intended.
This is especially important for long headings, buttons, images, and CMS content. A heading may have been designed to fit within two lines, but a longer title can create three or four lines and change the entire section height.
The same applies to images. When replacing an image, always check the image aspect ratio and make sure it works correctly within the existing layout. Buttons can also cause problems when the new text is longer than the original content. If the button becomes wider, it may affect the layout, especially on mobile devices.
Dynamic CMS pages require additional attention. Some users create new CMS fields but forget to connect them to the Collection Template Page. Adding a field to a Webflow CMS Collection does not automatically display it on the dynamic page. You need to connect the field to the correct element in the page structure.
Understanding how Webflow CMS dynamic pages and Collection fields work is important before making major content changes.
Changing the CMS Without Understanding the Collection Structure
Changing the Webflow CMS structure without understanding how the existing Collection works can create serious problems. A common mistake is adding new fields that already exist or creating duplicate fields when the required content is already connected through Reference or Multi-reference fields.
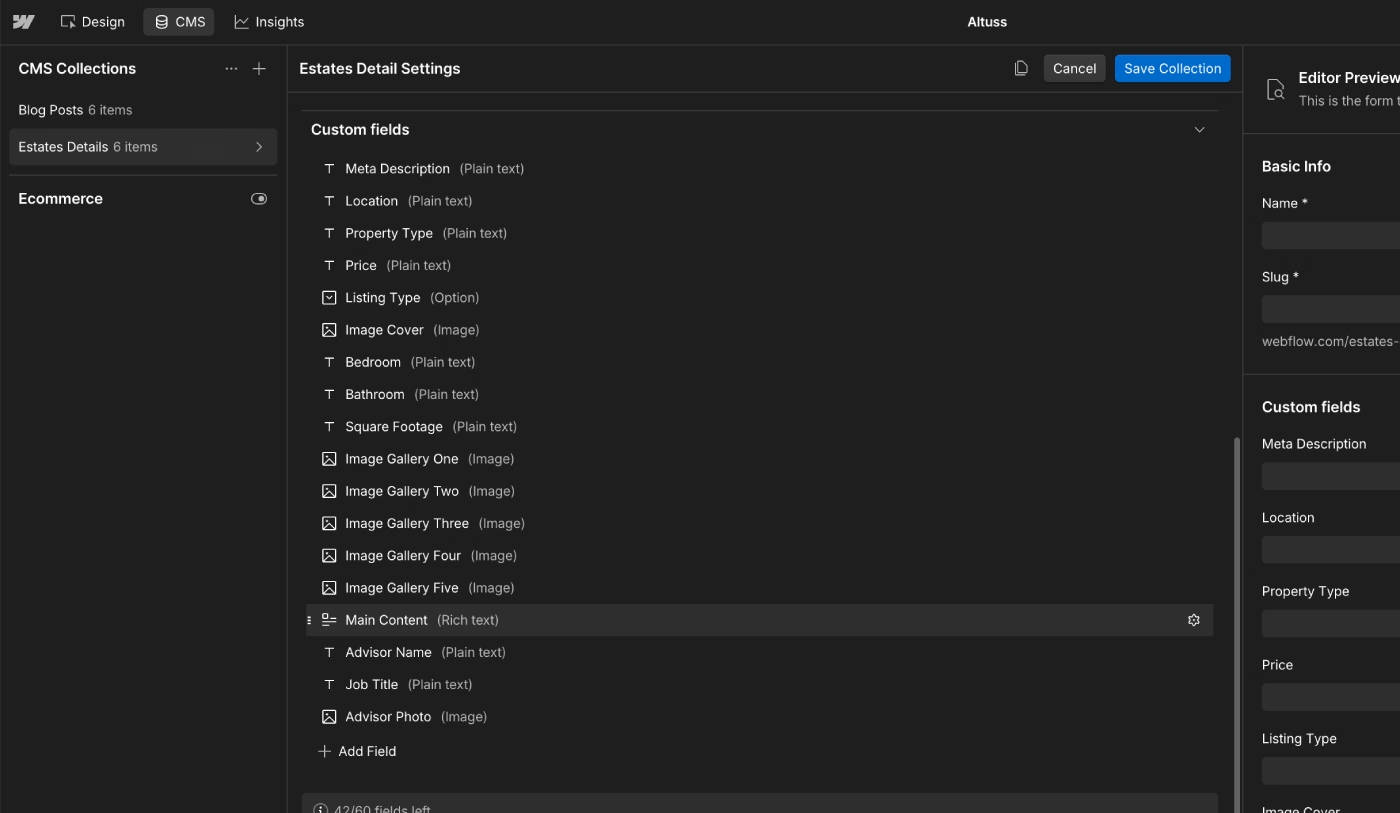
Before adding new CMS fields, review the existing Collection structure and check how the fields are connected to other Collections and dynamic pages.
Another common issue is deleting CMS fields that are already connected to the website. A field may be used on a Collection Template Page, inside a Component, or through a Reference or Multi-reference relationship.
Before changing or deleting any CMS field, always check where it is being used. A well-structured Webflow CMS architecture makes the website easier to manage, customize, and scale. Making unnecessary changes to the structure can create additional development work later.
Deleting Existing Interactions and Animations
Be careful when changing or deleting Webflow Interactions and animations. One common mistake is removing an Interaction from one element without checking where that Interaction is used elsewhere. If the same animation is connected to multiple elements, changing or deleting it can affect other parts of the website.
This can happen with reusable animations, scroll animations, hover effects, and button interactions.
Before removing an existing Webflow Interaction, check how it is used throughout the website. If you are not sure how the animation works, it is safer to review the existing setup or restore a previous backup instead of recreating everything from scratch.
Adding Custom Code Too Early
Another common mistake is adding custom code too early during Webflow customization. Webflow already provides many built-in features for interactions, animations, responsive layouts, CMS functionality, and components. Some users do not explore these options first and immediately add custom JavaScript or external animation libraries.
This can make the website more difficult to maintain and may affect website performance, page loading speed, and overall site stability.
Before adding custom code, first check whether the required functionality can be created using Webflow's native features. Custom code should be used when it provides functionality that cannot be achieved effectively with the standard Webflow tools.
Not Checking Accessibility and SEO After Customization
SEO and accessibility are often forgotten after customizing a Webflow template. When you replace the original content, update the pages, or add new sections, you should also review the website's SEO and accessibility settings.
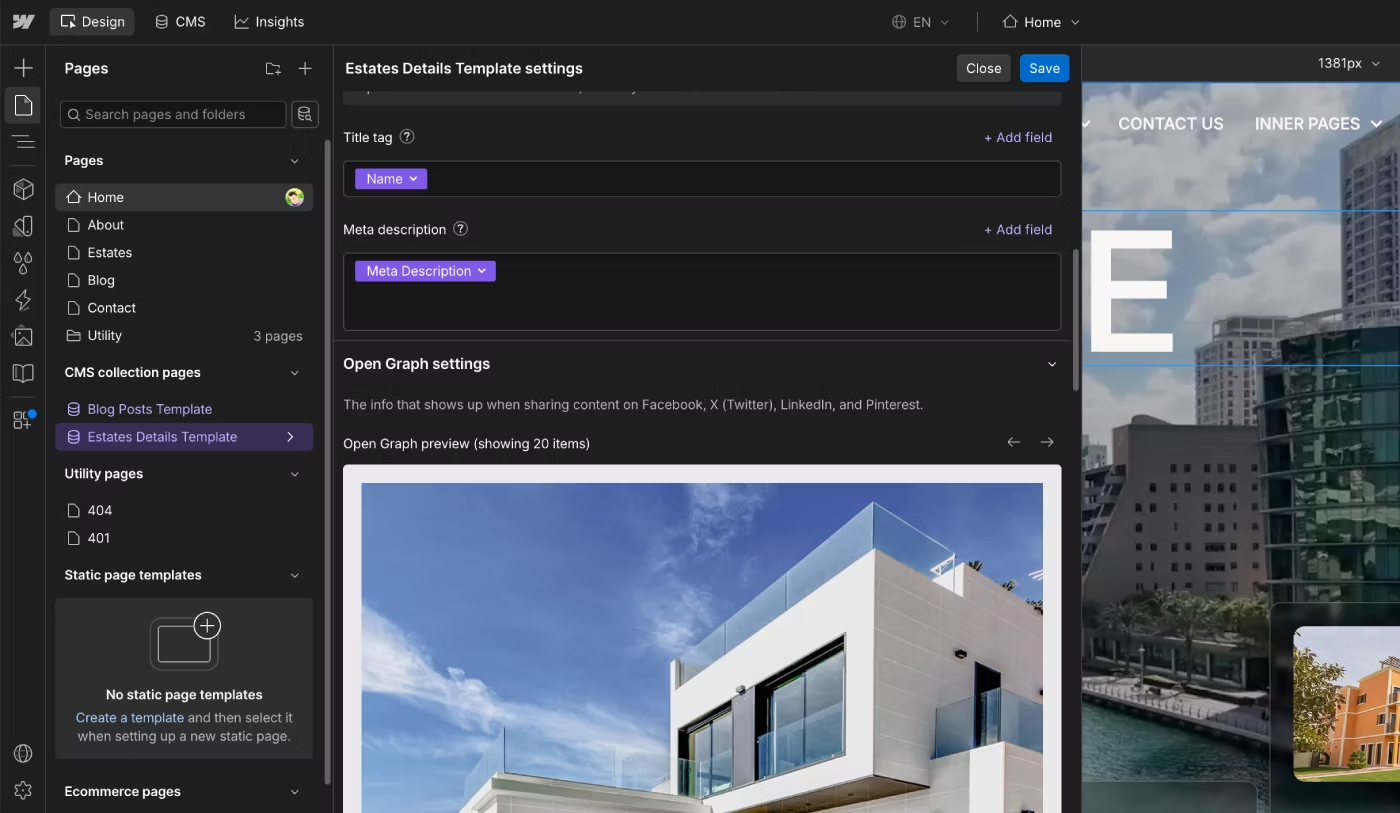
Make sure each important page has the correct:
- SEO Title
- Meta Description
- Heading Structure
- Image Alt Text
- Open Graph Settings
- Structured Data / JSON-LD
Images should have meaningful alt text, headings should follow a logical hierarchy, and important content should remain accessible to users and search engines. After customizing a Webflow template, it is important to review these settings again because the original SEO setup may no longer match your new content.
A proper final Webflow SEO and accessibility check helps search engines and AI systems better understand your website and its content.
How Long Does It Take to Customize a Webflow Template?
Customizing a Webflow template usually takes 3 to 14 days, but the timeline can be shorter or longer depending on the amount and complexity of the work.
Every project is different and may require specific changes based on the needs of the business. The customization process can be divided into several stages, allowing each part of the website to be updated and tested step by step.
Simple Customization
Simple Webflow template customization usually includes basic visual and content changes:
- Colors and Variables — colors should be organized in Webflow Variables so they can be updated from one place and applied consistently across the entire website.
- Fonts and typography — font families, sizes, colors, line heights, and letter spacing should be organized through Variables or the design system, making global typography changes much easier.
- Images — replace the template images with your own optimized assets. Image file sizes should be kept as small as practical to maintain good website performance. Webflow also provides built-in image optimization and compression features.
- Logo — replace all logo assets used across the website. The main logo is usually found in the Header and Footer, which are ideally built as reusable Webflow Components.
- Basic content — replace the placeholder content on static pages and add or remove sections when needed to properly present your services, products, or portfolio.
This stage can usually take 1 to 3 days, depending on the number of pages, content changes, and assets that need to be replaced.
Medium Customization
Medium-level Webflow template customization requires more changes to the website structure and content management system.
- Page sections — review the sections on all pages and add any sections that are missing from the original template.
- Components — review reusable Components that contain content and update their text, links, and other settings. Changes should also be checked across all pages where the Components are used.
- Variables — add any missing properties to the design system and check that sizes, spacing, typography, and other values work correctly across different breakpoints.
- CMS Collections — review and customize existing CMS Collections such as portfolios, categories, blogs, or projects. Add the required CMS fields and update the content displayed on dynamic pages.
- SEO content and metadata — replace the SEO metadata across the website, including page Titles and Descriptions, and configure Open Graph metadata for static and dynamic pages.
- Responsive adjustments — check all page layouts across desktop, laptop, tablet, and mobile breakpoints. The website should be tested again after new content is added.
This stage can usually take 3 to 7 days. The final timeline depends on the amount of new content, CMS customization, Components, and responsive adjustments required.
Advanced Customization
Advanced Webflow template customization involves significant changes to the original website structure and functionality.
- New pages — create additional pages required for the complete website structure.
- Significant CMS changes — modify existing CMS Collections and create new fields when the original CMS structure does not support the required content.
- Custom interactions — review existing animations and interactions after adding new content and changing page layouts. New interactions may also be required.
- Redesigning sections — redesign specific sections when the original layout does not fit the new content or business requirements.
- New Components — create new reusable Components or modify existing ones to improve content management and consistency across the website.
- Complex responsive adjustments — perform a final responsive design review across all devices after completing the structural and content changes.
This stage can take 7 to 14 days or longer, depending on the complexity of the page layouts, animations, CMS changes, Components, and overall customization requirements.
In this case study, I explain how we customized a Webflow template for a personal brand and what issues we found during the customization process.
What Affects the Webflow Template Customization Time?
The final timeline depends not only on the Webflow template you choose, but also on the amount of work required for the project.
Important factors include:
- how much content the client has prepared;
- how many pages need to be customized;
- how many new sections need to be added;
- whether new pages are required;
- whether the CMS Collections need to be modified;
- whether new CMS fields are required;
- how many Components need to be changed or created;
- whether existing interactions and animations need to be updated;
- how much the responsive layout needs to be adjusted;
- how significantly the original page structure needs to change.
A well-structured Webflow template with a clean class structure, Variables, Components, CMS architecture, and responsive system can significantly reduce the time required for customization.
In practice, simple customization may take only a few days, while a larger project with new pages, CMS changes, custom interactions, and structural modifications can take two weeks or longer.
Final Checklist Before Launch
Before publishing your website, take a few minutes to review this final checklist.
- Replace your logo in the Header, Footer, and other sections.
- Update your global colors using Variables.
- Change fonts and verify they support all required languages.
- Optimize images, check aspect ratios, and add descriptive Alt Text.
- Complete all SEO metadata, including Meta Titles and Meta Descriptions.
- Review every CMS Collection, update the content, and add new Collection Fields if needed.
- Test all forms, update notification email addresses, and review success and error messages.
- Check responsive layouts on desktop, tablet, mobile, and landscape orientation.
- Review website performance using Google PageSpeed Insights and Google Search Console.
- Replace the default favicon with your own.
- Update all social media links.
- Add Open Graph images to both static pages and CMS Template Pages.
- Review your custom 404 page and make sure it helps visitors return to your website.
- Create 301 redirects for any deleted pages or CMS items to prevent broken links and preserve SEO value.
Going through this checklist before launch can prevent many common issues that are much harder to fix after your website is live.
Final Thoughts
Customizing a Webflow template is much more than replacing colors, fonts, and images. A professional website also requires careful planning, a well-structured CMS, proper SEO settings, optimized performance, and consistent design. The goal isn't simply to make the template look different - it's to preserve the scalable system it was built on. Avoid breaking Components, overriding global styles, or making unnecessary structural changes. Instead, work with the template's existing design system whenever possible.
The better you understand how a template is built, the easier it becomes to customize, maintain, and expand as your website grows. A well-customized Webflow template doesn't just look professional - it stays organized, scalable, and easy to manage long after your website goes live.